Besides asking for his credit card. ;)
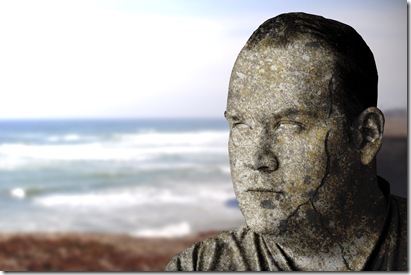
I started playing around in Photoshop today and for some odd reason thought it would be fun to turn Sean into an old stone statue. It really didnt even take too long. Ok fine, I played around a lot and it took me almost two hours BUT if you decided to play, it probably wont take as long because I was stopping to take screen shots for a tutorial as well. This tutorial is for people who are fairly familiar with their photo editing software. I did mine in PS but I am sure it could easily be done in other programs as well.
1. Decide on a photo. I chose one of Sean because he looks so regal. HAHAHA!
2. Extract the image from the background. I use the Polygonal Lasso Tool because I feel I have better control. Simply trace along the outside of your image, invert your selection,CTRL-Shift-I, and delete.
3. Desaturate and optimize Contrast. Next I simply desaturated the photo, CTRL-Shift-U, and then I added a wee bit of contrast, Image-Adjustments-Brightness/Contrast.
4. Edit the eyes. Statues generally do not have eyes so we have to get rid of them. I simple used my Polygonal Lasso tool again to trace the eyes. On a new layer above my extracted image, I simply used the Paint Bucket to fill in the areas with a light grey color. Now we cannot just leave this because it would not be correct. We need to add some shading so the eyes look like they belong there. Simply add an Inner Shadow to the layer. You want something a little dark and a touch of noise, so its not too smooth. Merge the two layers, CTRL-E.
5. Add Texture! You can use as many, or as little, texture layers as you want. I imagine using just one would be more then sufficient but I was really playing around with this. I ended up with three different texture layers. The first one a simple gray pebbled stone texture, the next a more yellow mossy texture and finally a crack from a picture of cement. I just clipped the texture onto my extracted imagine, CTRL-ALT-G, and then played with the blend modes, generally ending up with Multiply and then adjusting the Opacity of the layer to suit my photo. On my Crack layer I also added a slight down bevel to give it some more realism.
6. Add Depth. With my final image completed I thought it needed a tad bit of shadowing there on the left side so I added a simple Inner Shadow to the layer, very lightly. Then I added a background. I chose a photo of the view Sean was looking at in this photo. I added a great deal of blur to the background image with the Gaussian Blur tool, Filter-Blur-Gaussian Blur, to give it lots of depth and using the Lighting Effects tool, Filter-Render-Lighting Effects, I added a bit of sunlight coming from the upper left of the photo towards Sean's face. I also added a wee bit of Dodging/Burning to highlight some areas that lost some of the detail. Just play around and have fun!
I have no idea what I could possibly do with this but I had fun. Hope you do as well. If you decided to do this tutorial please link me up. Holler if you have any questions. :)
Here are the textures I used if you are interested. I took these myself with the old camera and never used them. These are for PERSONAL USE ONLY. Just click on the image for the full size. I wanted to use all my own photos but there are lots of Stock Exchange sites out there that offer free downloads of marble, stone, other textures, etc., that would work wonderfully.
Please do not use any part of this tutorial, or these images, on any other site/blog, without my consent. Thanks so much!


4 comments:
Aaaaah, Amy turned into Medusa!!! :D Just kidding.
This is such a fun tutorial. Your result turned out really great! TFS.
Definitely regal- what an effect. I'll be trying this one. Just need to find the time to play...
VERY VERY VERY COOL, AMY!
This is fabulous! You'll have to keep pigeons away from him now... ;)
Post a Comment